
Building my ITX PC, DIY-style
and started my journey into the rabbit hole

Updated: Changed a few terms and new screenshot provided.
The mission: build a new PC for my audio and music recording.
Challenge #1: Getting the right specs within budget.
Challenge #2: Putting the parts together and making it work—without any problems.
Challenge #3: Installing an operating system, applications, and other software—again, without hitches.
It started with a chat with one of my friends at work. I saw her Instagram showing a monster gaming PC rig she put together, DIY, and I wanted in.
So, I chatted her up and shared some top-level specs for my custom-built PC. I pointed her to this Home Studio Recordings website, which gave a list of basic components to acquire. I’m quoting the TL;DR version of the article below:
So the question was: What Computer Specs do I need for Music Production PC?
The minimum recommended computer specs for music production are:
CPU: A minimum 2.2Ghz i7 quad-core processor & 64-bit operating system. ✔
Memory: A minimum of 16GB of RAM.✔✔
Storage: A minimum of 500GB HDD or preferably SSD (faster). You’ll also need external storage for storing your audio files (a minimum of 500GB). 👌
Monitors: At least a 15-inch screen and having dual screens is preferable. ✔
Mouse: A mouse with side scroll feature. ❤
A few weeks after our chat, I got back a list of more components that I needed to requisition through local PC distributors.
(Given that there’s a pandemic, most PC parts are sold online. Payments are then made via bank transfers or via e-wallets).
Here’s the quote I got after some online window shopping:
CPU: 2.9Ghz with a 6-core processor & 64-bit operating system 👍
Memory: 16 GB of RAM 😍
Storage: 1 TB SSD NVME (yes, SSD is indeed faster). I didn’t buy an external storage.✔✔
Motherboard: Asus ROG Strix Z490-I Gaming, a small-form factor (SSF) motherboard that fits into a compact ITX case. 😎
Monitor: Got a right-sized one
Mouse/Keyboard: Got a wired gaming mouse that comes with side-scroll and a mechanical keyboard that lights up like Christmas.
I also bought a standard power supply, a CPU air cooler, and two extra fans to cool the insides of this ITX PC build.
I went back online, made and confirmed the order, transferred the money, and went to the PC distributor’s branches where the components were in stock.
When I got back home, I set the colorful boxes of PC parts aside, and went to bed.
Now comes the building
My friend-colleague and I initially agreed that she will help me assemble this new PC rig.
But as events unfolded and the cases of Covid-19 surged in the first weeks of January, my hopes of getting an extra hand to assemble my new toy faded. I have to build this by myself with the help of my eldest daughter who loves to tinker with stuff.
Of course, I was nervous and unsure if I could build this PC alone. So to erase doubts, my friend sent me several YouTube video links (thank god for YouTube) and articles to read (she knows me well).
Watch these useful YouTube tutorials:
Cooler Master NR200P Air Cooled PC Build Guide
Guide: What to do AFTER building your computer...
Ultra Airflow, Zero RGB - 1440p ITX Gaming Build
I watched each video and asked questions, if necessary. I skimmed through the manual for more specific steps. (At this point, my head was spinning).
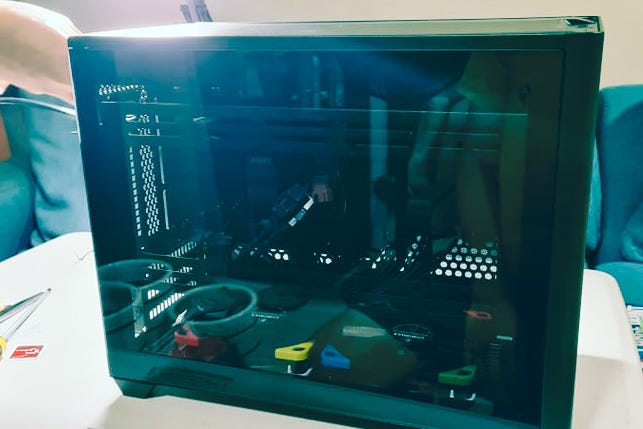
Unboxing each component was fun. I assembled the little tiny parts, the cables, the wires, the screws, and little contraptions on the work table. You didn’t want to mix these little parts up.
I froze for a second when I saw the motherboard. The first step was to place the small but powerful Intel chip on the motherboard. You have to be careful. A wrong placement will destroy this expensive component.
Next came the mounting of the CPU air cooler on top of the chip. Checked. Slot in the two RAMs onto the motherboard. Done.
After half a day of slow but sure assembly of PC parts, my daughter and I rejoiced seeing the result of hours of tech labor. The ITX PC is finally looking like pictures of custom-built PCs.
The trouble begins
But first, I needed to check if the PC runs.
First try, nothing. There was no power except for the SSD lighting up on the motherboard. The CPU air cooler fan and other fans installed were not spinning. Something was wrong!
Panic, doubt, and anxiety kicked in.
Did I manage to damage my system before I could even run it? Did I mess up the power supply cables? Did I short-circuit the motherboard? Did I destroy my PC? 😭😨😢
I called for help and my friend-colleague answered. I explained to her what’s wrong (or what I thought was). I turned on my phone’s camera to show her the motherboard, which has been detached from the ITX case. She gave some troubleshooting instructions.
Troubleshooting is NOT my cup of tea. I hate it. It leads to technostress. But I had to do it.
Reseat the chip/RAM on the motherboard.
Take out one RAM and reseat it.
Check the power cables.
Go back and read the manual!!!
These instructions came through the Messenger chat. I also got a set of links to read, and new Youtube videos to watch.
I checked the time: it was close to midnight. I decided to call it a day, and sleep on this problem.

Troubleshooting is fun 😍
Fresh from a five-hour sleep, I looked at my messy PC build with renewed interest the next day. My challenge was to figure out why it won’t run.
I read through this Basic PC Build Troubleshooting article, and checked each technical problem.
Here were important troubleshooting tips mentioned in this short article:
These steps resolve 90% of the issues we encounter. Take a look:
Check that all power cables are adequately connected to the three primary locations. (The right cables and wires should be placed on the right pins).
Reseat the RAM. (Remove the RAM from their slots and replace them).
Reseat the video card. (Same as item number 2).
Clear the CMOS battery. (This, I didn’t do).
If these troubleshooting actions didn’t resolve the problem, I had to take the PC apart, with some components taken out of the case:
Power Supply
Motherboard
CPU
1x stick of RAM
This took half a day. Then my colleague-friend noticed something odd with my connections. She pointed out that a led indicator should light up on the motherboard. I didn’t see any led light on.
More troubleshooting tips here.
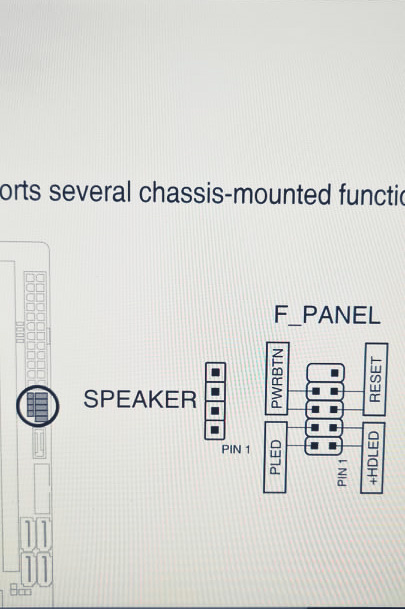
Looking at the manual, she encircled a set of pins next to the slots of RAM. A set of wires from the ITX case should go into those pins at a certain order. It was important that I matched the thin wires with each pin! Several tries after, I managed to connect the right wires with the right pins!
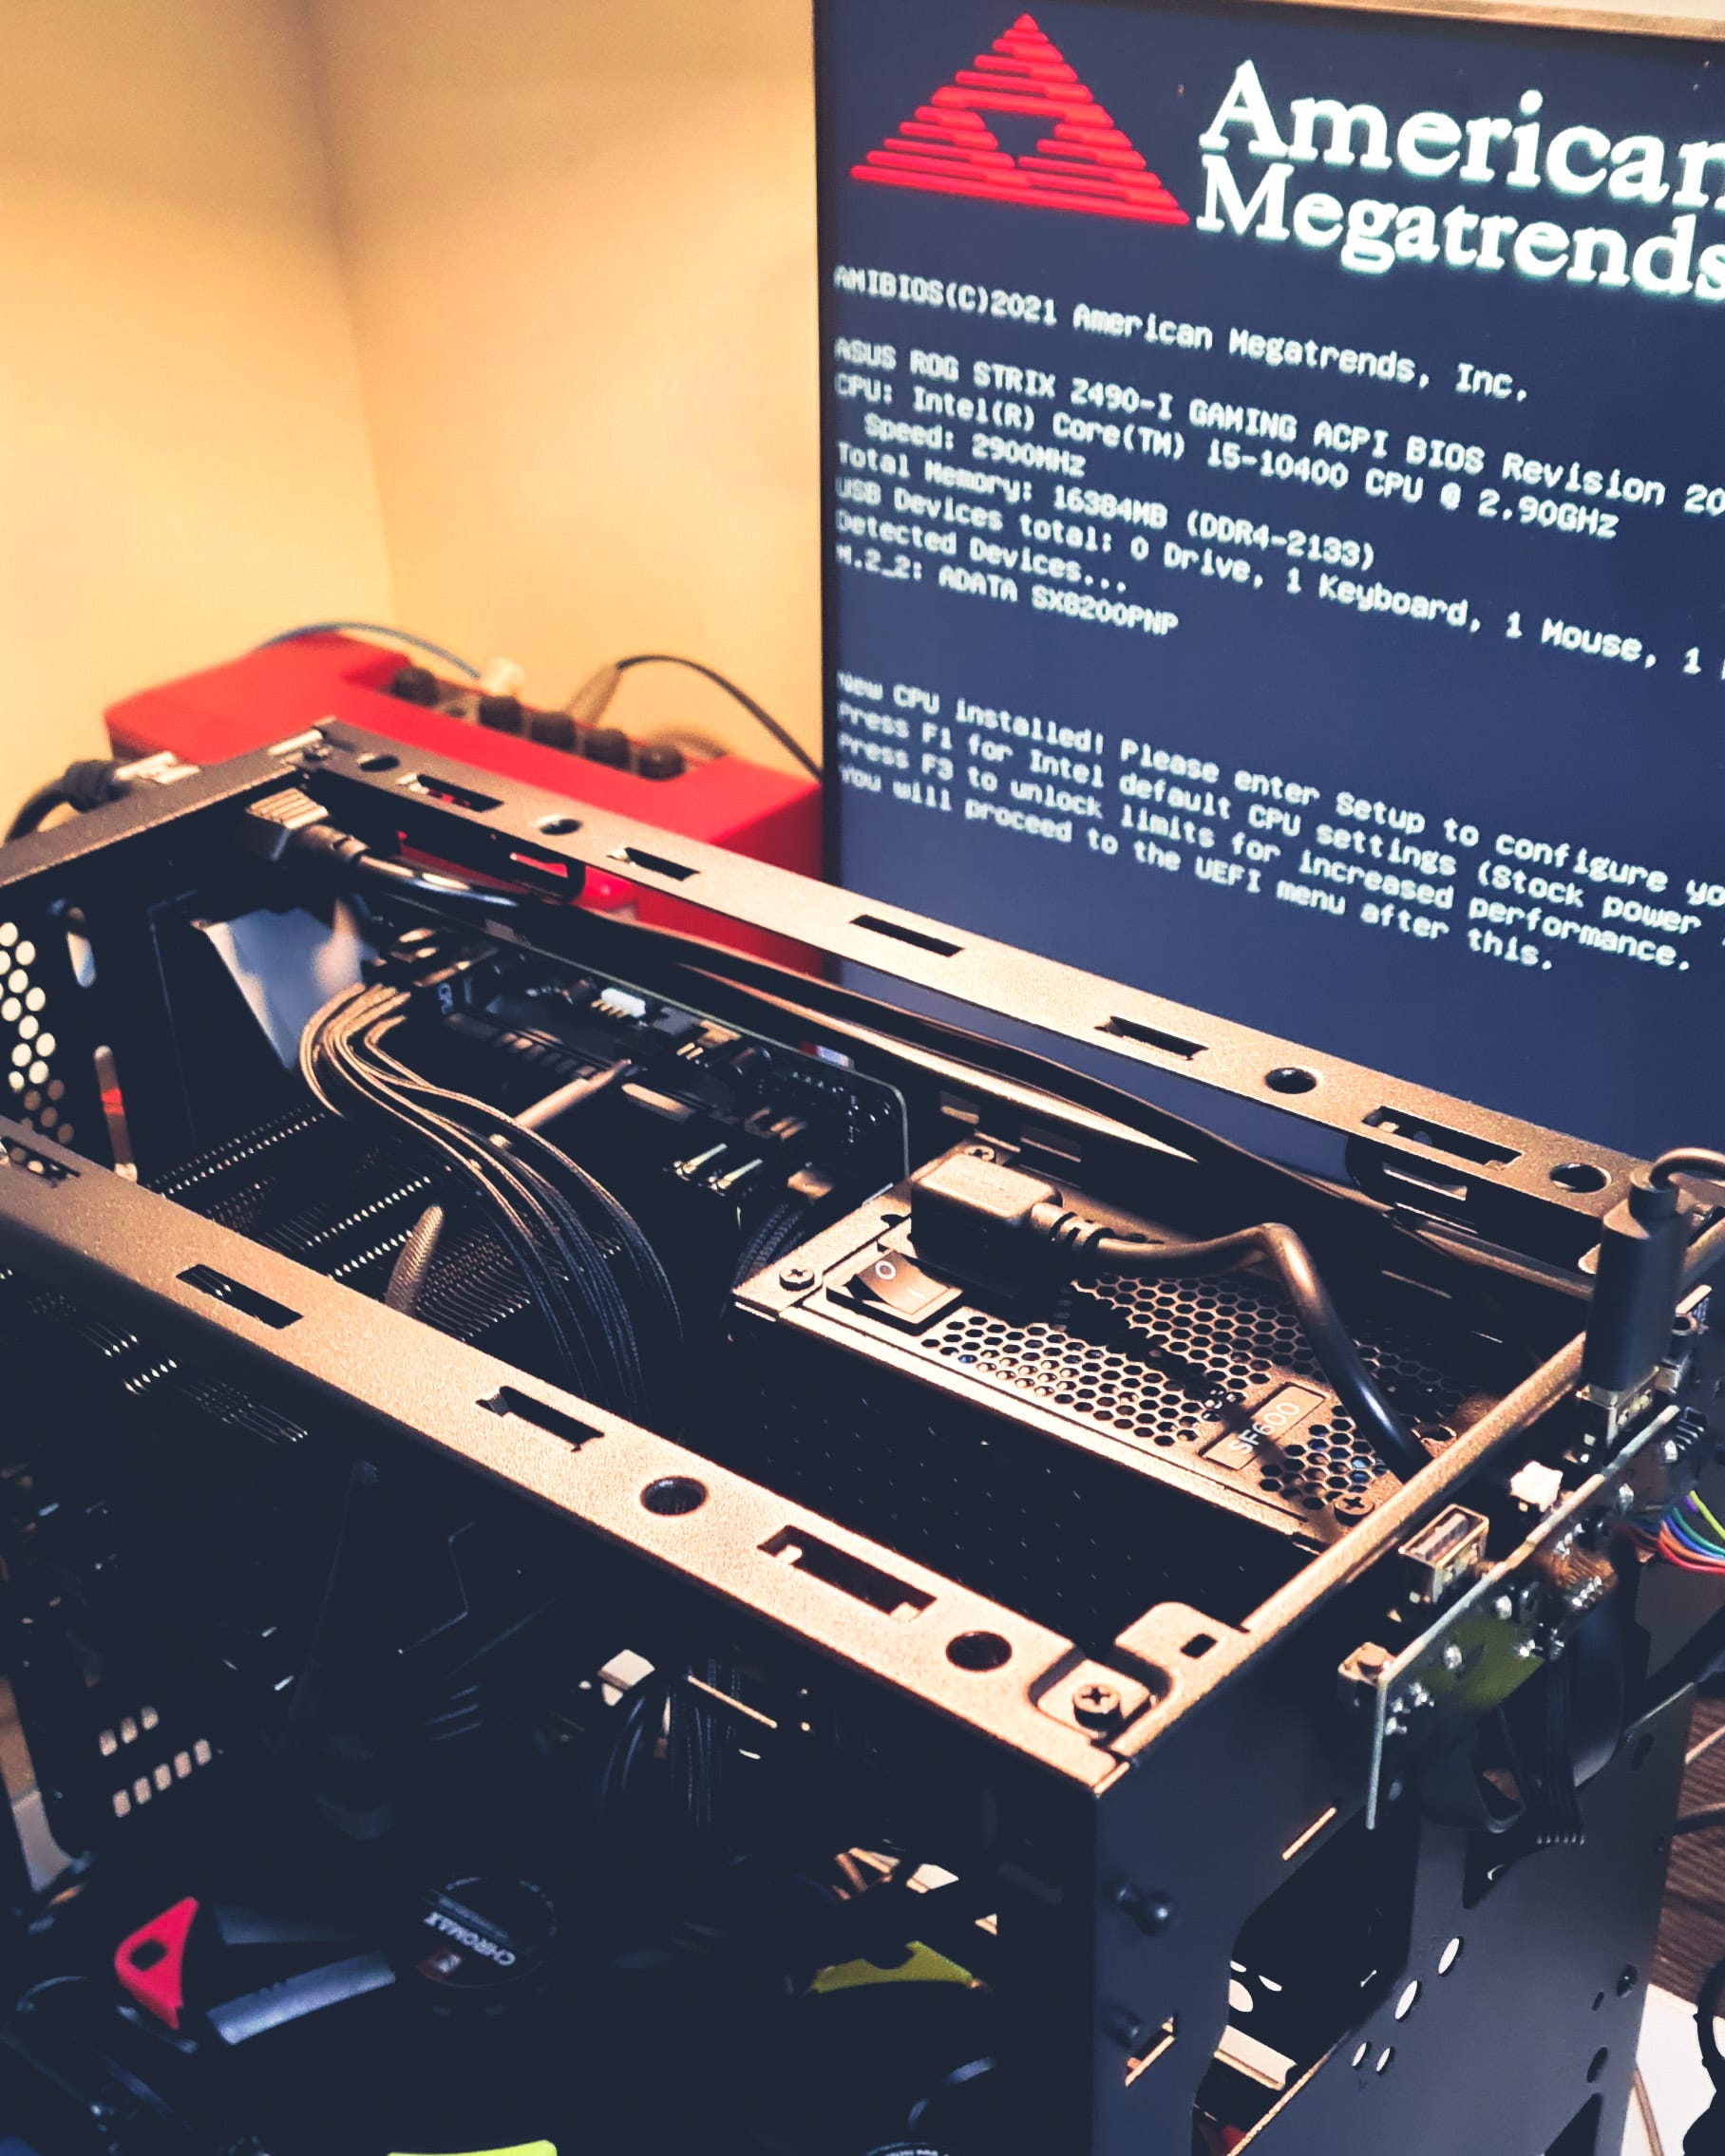
Then, the moment of truth came: I turned the PC on—and voila, the machine was alive. Almost.
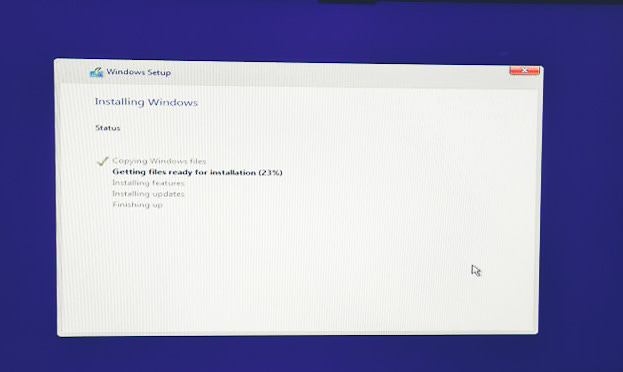
I went ahead and installed the operating system, updated the drivers, installed the productivity software, and the music and audio recording software that came with my audio interface.
All in all, this PC build took me two days of tech labor, a handful of YouTube videos, a couple of online articles, and several video calls to my friend-colleague who was patient enough to answer each query I had.
Up next: My journey into the rabbit hole of accessories, tidying up my workspace, desk, and those pesky wires/USB cables.
Author’s note: During the day, he spends a lot of time with words. At night, he busies himself with learning audio recording.